

Introduction: How to Make an Accurate (and Attractive!) Clock Time Sundial


Always been fascinated by sundials but never found a design that I really liked till I started seeing more modern designs which incorporated polar maps of the northern and southern hemisphere in an equatorial sundial. I ended up designing my own equatorial sundial with an adjustable time dial that could be set for accurate clock time. This has worked out so well that I have had friends and colleagues requesting I make them a few!
Hope you will like putting this sundial together.
Supplies
I used a laser cutter to etch and cut the sundial out of acrylic sheets. Note acrylic is UV resistant so should not get damaged in the sun. If you have a CNC you could potentially make this out of metal plates. You will also need acrylic poster paint to pill in the etched lines. I went a bit crazy and painted the continents with a bronze color and the oceans with a blue acrylic paint. And then covered these with an acrylic varnish.
Step 1: Designing the Sundial

The equatorial sundial is a classic design with the advantage that the time indications are uniformly spread so sun time could be adjusted to clock time by just rotating the time dial. One disadvantage of this type of sundial is that during the winter months the shadow is cast on the bottom part of the dial and during summer the shadow is cast on the top part of the dial so you have to place the sundial where both the bottom and the top can be read.
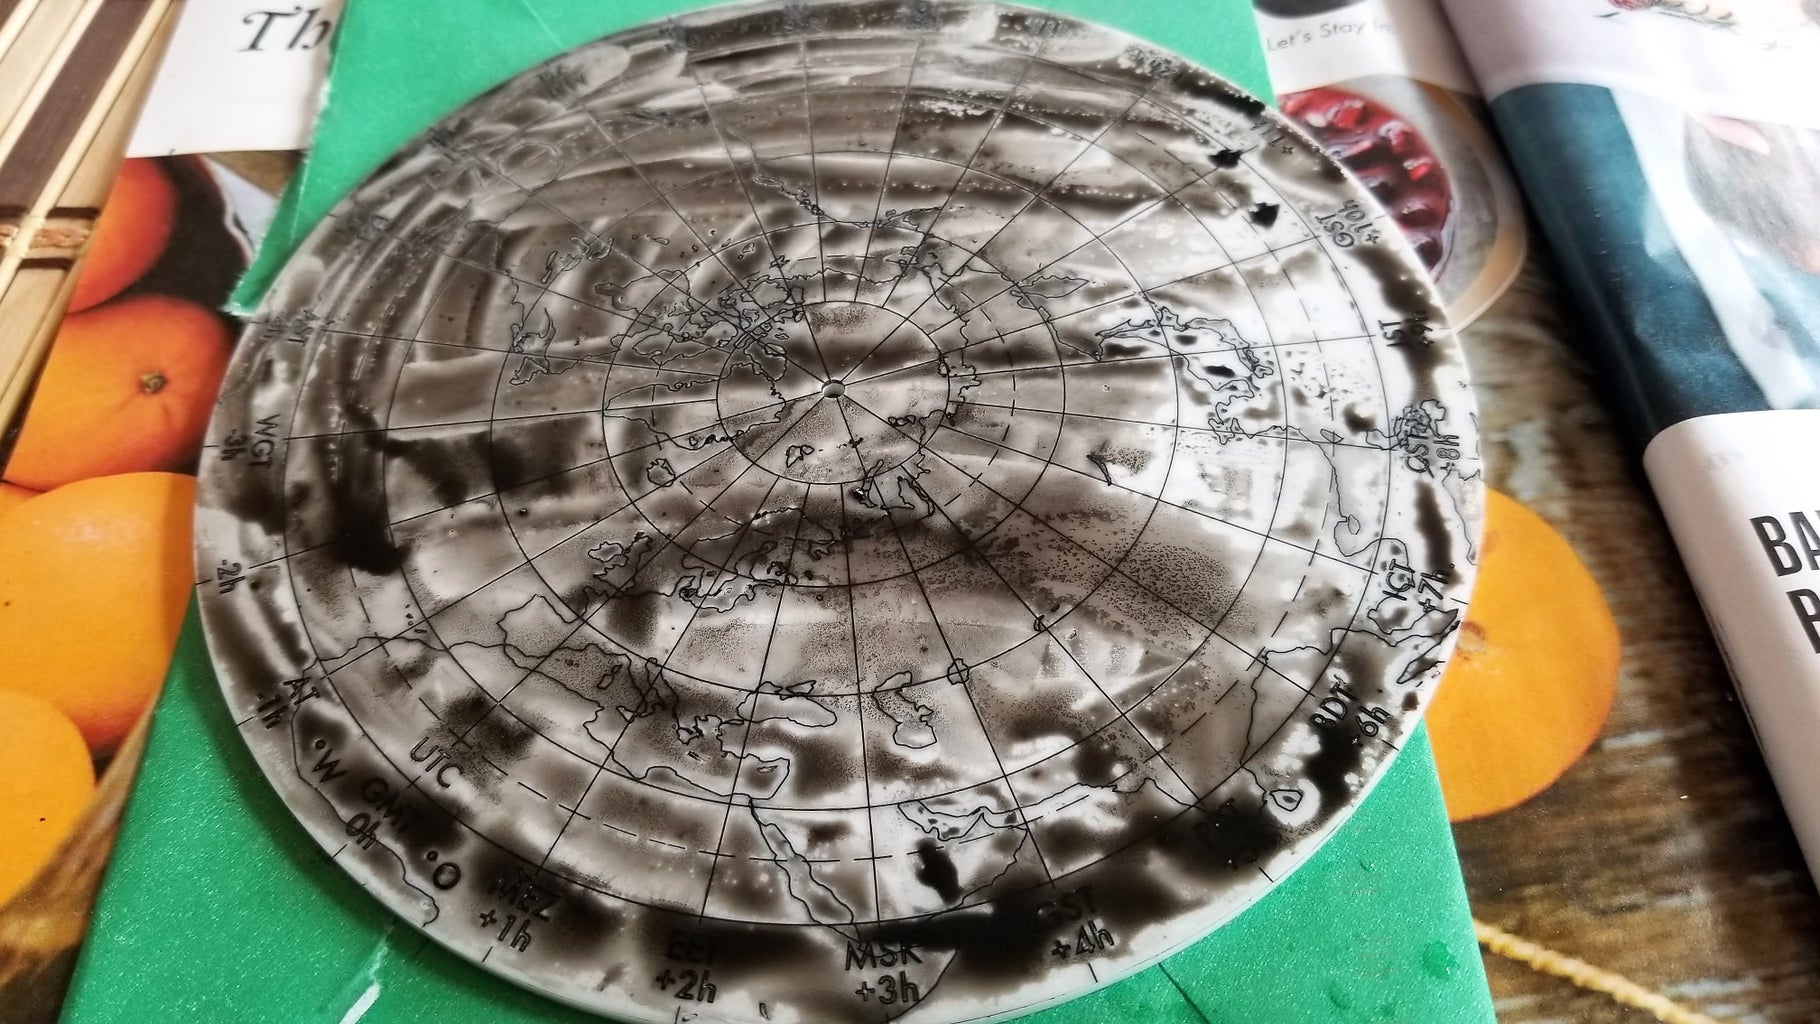
For the construction I used a central plate sandwiched between two map dials that are attached to that central plate with screws. The maps can be adjusted for the longitude by rotating the map till the longitude of your location is above the center line of the central plate.
The gnonom of the sundial points to true north and the whole plate is angled at an angle of your latitude subtracted from 90 degrees (Angle of plate = 90 - latitude). For greater flexibility the plate can be hinged so that the angle can be adjusted for different latititudes - I used a fixed angle which is for 49 degrees North latitude where I now live.
I downloaded northern and southern hemisphere maps and drew out the whole sundial using the Xara software and exported the different parts as PDF. The PDF files are attached with the usual rules for laser cutting: Red lines are cut, Blue lines are etch and Black are raster drawings. You should be able to import the PDF into an SV editing software such as Inkscape to make any changes or resize the parts.
Attachments

Step 2: Laser Cutting and Preparing the Dials


I etched and cut the dials on a laser cutter out of 3mm acrylic pieces that had protective films on them. After the lasering, I peeled off the protective films from the bottom and the top.
The pieces were washed with liquid dishwashing detergents to remove any glue residue and any carbon burn marks. The other pieces are for some other projects.
Step 3: 'coloring' the Etched Numbers and Legends on the Dials


After the wash, I brushed on black acrylic paint onto all the surfaces, let it dry, and then rubbed off the excess paint on the surface with a soft cloth moistened in 70% isopropanol.
I finally rubbed acrylic varnish onto the surfaces to seal in the paint.
Weeks later I added more color - blue oceans and bronze continents!
Step 4: Assembling the Sundial


I assembled the sundial by
- Aligning the top and bottom map plates so that the longitudes were aligned and drilling holes for four screws in these map plates.
- The N hemisphere top plate was then stuck to the central plate with a piece of double sided tape with the center of the plate aligned with the center of the central plate and the longitude of my location aligned with the line etched on the bottom part of the central plate.
- Holes were drilled into the central plate using the previously drilled holes in the top plate as a guide.
- Four screws were partly inserted into the top and central plate and then the bottom S hemisphere plate was attached. The screws were tightened holding all three plates together.
- I then slid on the bottom numerical time ring onto the S hemisphere plate. Same with the top numerical hour ring onto the N hemisphere plate. Aligned the two rings together and glued them with scraps of acrylic that bridged the top and bottom hour rings. These rings can rotate around about 30 degrees (about 3 hrs worth) though they are connected to each other at their edges.
- Finally glued on the angled supports. BTW, by glue I mean acrylic welding cement, a liquid which fuses acrylic pieces together.
Step 5: Installing the Sundial on Site


Installation is pretty simple (the pictures are after a test install)
- Find a thick metal wire - I used a piece from a wire hanger.
- Bend one end of the wire to form a T- or L-shape. The T- or L-shape serves as a support for the sundial.
- Slide the wire through the central hole. The hole should be a tight fit around the wire.
- Rest the sundial on a known level flat surface (I used a bubble level to make sure that my kitchen table was actually horizontal) so that the angled pieces are in contact with the flat surface.
- Slide the wire till the T- or L-shape rests on the horizontal flat surface. Apply some glue to the central hole in which the wire, the gnomon, was inserted to prevent the wire from sliding.
- Find true North with a smart phone app and mark this on the flat surface to which you are going to attach the sundial. The flat surface should be checked with a bubble level.
- Attach the sundial to this flat surface with the gnonom pointing to true North. I used silicon adhesive to attach.
- Rotate the hour ring so that the cast shadow shows clock time.
- The hour ring needs to be adjusted once a week to correct for the difference between clock time and solar time.
Quick aside: The shadow line on the map shows true noon. For example, if the shadow line is over east UK, then it is noon in east UK!

Participated in the
For the Yard


